
Origami candy boxes are great for weddings and parties. The best part is that they require almost no preparation, and all you need is one sheet of square paper. They’re actually simpler to make than they look too, and since they only take a few minutes to make, they’re worth it.
So, if you want a small one, you want to use 7.5 by 7.5 cm for the small ones, and for the larger ones, you want to go with 15cm by 15cm, and you should make sure that it does have the origami thickness to the paper itself. Usually, if the pape has a white side, you won’t fully see it either, so choose one that fits the theme, and a color that you want.
Firs, you want to start with the white side f the paper up, and from there, fold the paper in half, with the top to the bottom, and then unfold this. From here, fold the top and then the bottom edge to the central crease, and from there, fold this well. From there, you’ll want to flip the paper from one side to the other side and then left to right. From there, fold the left edge towards the right, and then unfold, creating a fold that’s neat and central too.

you’ll want 8 equal sections, and you’ll want to fold the left, and then the right edge to the central crease just made. Unfold the lap on the right, and then fold the right edge towards the left edge, and then crease this well. Repeat this to the other side. From there, fold the left and then the right edges inwards and then unfold, completing the division of this to 8 different sections.
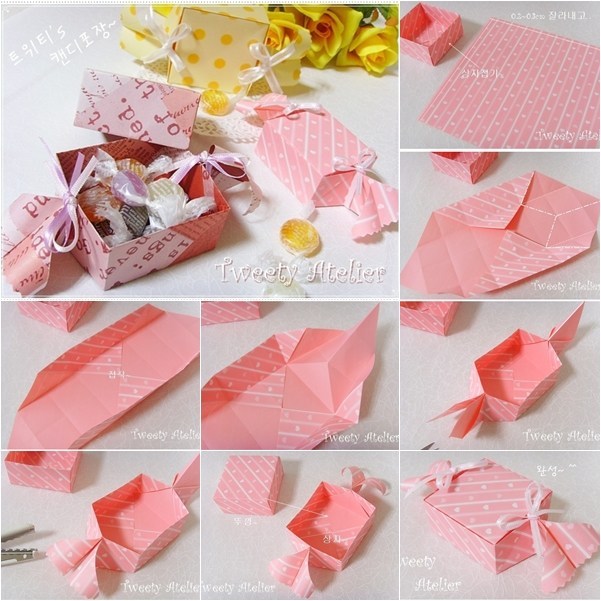
At this point, you want to make a fold near the bottom edges of the central one, and then flip it over, and you’ll then want to have the valley folds brought to the center of this, and crease it at each corner. Fold this, and then push the top and bottom edges of this up, creating a box. You’ll then notice mountain and valley folds, pushing where it’s indicated, and then, you can move onto the final step for this.

Your final step is to push the ends together, and then open out of the end and push the squash fold together in order to flatten this. Repeat this on the side that’s on the left. Now, if you want a rounded candy look to this, pull the top and bottom edges out, flatting the left and right side near the top. If you want to make them look rounded, fold them inwards and make diagonal folds that are indicated.
At this point, you should have an origami candy box. It’s that simple! And, you’ll be able to with this create a wonderful piece that you can use to help add a bit more fun to your candy making party too.